Using Input and Custom Design
This tutorial emphasizes using an input file for your
search criteria and creating a custom format for your report.
 To create a custom
format batch report using an input file
- After you log in to Haystack
Gold, select Reports, and then
Batch Setup.

You are now at the BatchPlus
Settings page. All of the optional and required fields are available to
you from this screen.
 Note:
Required
fields have been marked with an asterisk (*). All other fields are optional.
- In the Batch
Settings section, leave both Title and Description blank.
- In the Database field,
select Federal Logistics Information
Service, which is the default setting.
- From the drop-down list
to the right of the Search Fields field, select NSN
or NIINs.
Creating an input file
Before we can browse for an input file, we have to create
and save NIIN search criteria in a text file (.txt) that you place in
a folder on your computer.
- Start Notepad, either
by clicking the Windows start
button, and then choosing Run
or by pressing the Windows Key
and R together.
- In the Open field of
the Run box, type notepad.
- In Notepad, enter a list
of NIINs, one per line, like the following:
005347553
000000079
000000101
- Save your file with a
name and to a location that you will be able to find, such as NIINBatch.txt
in your My Documents folder.
Returning to BatchPlus
Settings
Now that you have created your input file, return
to the third section of the BatchPlus
Settings screen, which is Output Options.
- To input a file, click
the Browse button next to the
Input File Name field.
- Locate the NIINBatch.txt
file you created.
- Leave the default ("III CHOOSE OUTPUT FORMAT ***)
in the Format field.
- Click the Create
button.
This launches the Report Designer
Settings screen in a new browser window. This screen allows you
to create and save a custom report format that can be re-used and modified
to suit your business needs.
Report Designer screen
- In the Database field,
select the default Federal Logistics
Information Service.
- In the Report Name Field,
give the report a meaningful name.
- In the Description field,
describe your report. This is optional; however, this field allows you
to add descriptive information about the report format.
- In the Show Headers section,
leave all values blank (these headers only apply to PDF output).
- In the Type field, select
MS Excel (*.xls) from the drop-down
list.
- Click the
 button.
The Report Data Layout screen
is displayed. From here you can select the database segments and fields
to include in your report. Note that these database segments and fields
are labeled the same as the fields you see in the Haystack display.
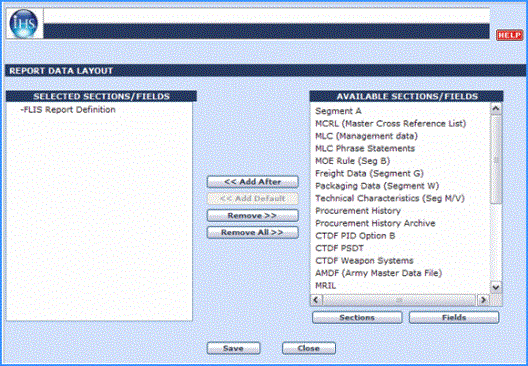
- In the Available Sections/Fields
pane, single click Segment A,
and then click the
 button in the middle of the screen.
Segment A is added below FLIS Report Definition in the Selected Sections/Field
pane.
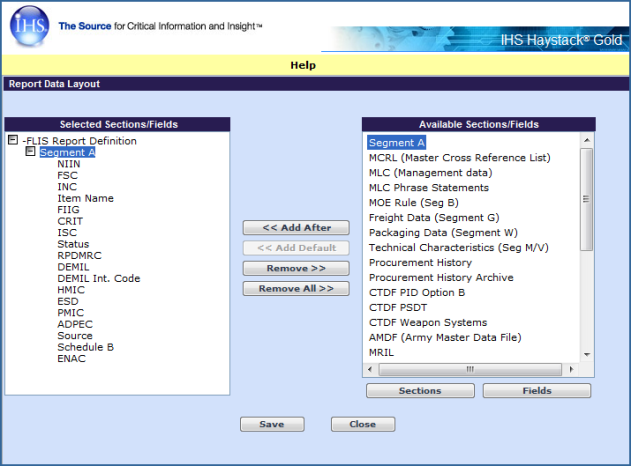
- In the Selected Sections/Fields
pane, click the plus sign (+) next to Segment
A.
Segment A expands and a list of all of the fields in that data segment
is displayed.
- To see a list of all
fields available in Segment A, in the Available Sections/Fields pane,
click the
 button below the Available Sections/Fields pane.
- To remove a field, simply
highlight it in the Selected Sections/Fields pane, and then click the
 button.
 Note: Default
Fields
The Report Data Layout screen defaults to the most commonly used fields
in each data segment. These are displayed in bold in the Available Sections
Fields pane. Non-default fields are shown in green and can be selected
the same way as default fields.
The  button allows you to quickly select all of the default
fields in a Section. This is useful when you are modifying a custom report
data layout and would like to quickly add a number of fields at one time.
For example, if you would like to add all of the default Segment A values
to the existing layout shown below, simply click the
  button
to select all of the fields in bold in Segment A.
The fields are copied to the Selected Sections/Fields pane.
Creating an extreme report format
As a tutorial example, let's create an
extreme format to show the power of creating custom reports.
- In the Selected Sections/Fields
pane of the Report
Data Layout dialog box, remove all of the fields below Segment
A, except for NIIN, FSC, INC., and Item Name.
- To display the list of
database segments in the Available Sections/Fields pane, click the
 Sections button below
the pane.
- In
the Available Sections/Fields pane, highlight MCRL
(Master Cross Reference List),
and then click the
 button.
- To expand the MCRL section
in the Available Sections/Fields pane, click the
 button
below the pane.
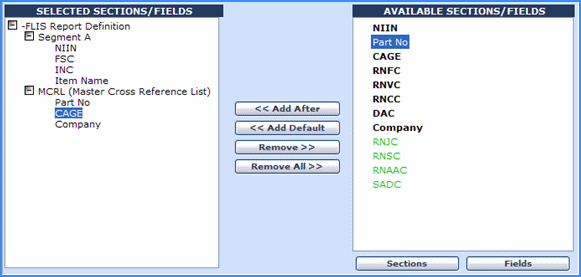
- In the Selected Sections/Fields
pane, remove all of the fields below MCRL, except for Part No, CAGE, and
Company. You list should now look like the following example.
- To save your setup, click
the
 button.
You are returned to the Report Designer Settings page.
- To save your settings,
again click the
 button on this screen.
You are returned to the BatchPlus
Settings page.
Completing the BatchPlus
Settings screen
Now
that you have created the format for your custom designed report and your
input file is loaded, you can quickly finish the Output Options and Run
Batch sections of BatchPlus.
- Select
the output format you have just created (NIIN
Search Custom Output) from the
Format drop-down menu.

 Tip: Press the first
letter of the name of the output format you created to quickly jump down
the list of available output formats.
- Leave the Output File
Name field blank.
- Leave the Archive type
set to PKZIP Compression.
- Click
the
 button.
Your search criteria are loaded into the batch system and you are presented
with a summary page of your batch job.
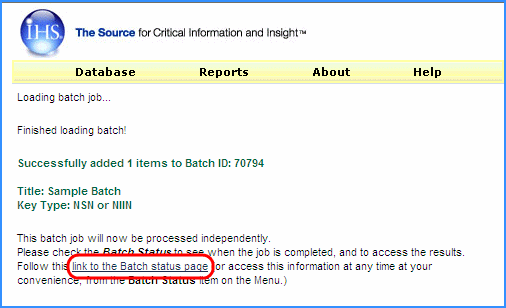
- Click "...link
to the Batch Status page..." to view a list of our batch jobs.
The Batch Status page displays a list of all of the batches you have
processed.

- Click the hyperlinked
Batch ID value to see a summary of the batch settings. Click your browser's
Back button to return to the Batch
Status page.
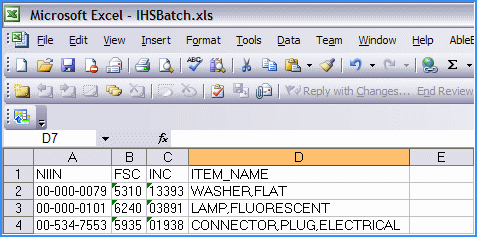
- To
view the output Excel file that contains the results found in Haystack,
click the link under Output
File to the far right. The results
in compressed format are named IHSBatch.zip because we did not give a name during creation.
Note that the Excel file only contains two worksheets, shown as tabs
across the bottom. These two tabs match the Segment A and MCRL data segments
that we selected earlier.
When viewing the data, note that the columns match the fields chosen
in the previous steps—Segment A –
NIIN, FSC, INC, Item Name, and MCRL –
Part No, CAGE, and Company.


You can reuse the report format you created any time you wish. You,
of course, must upload a text file (.txt) with NIINs you want to search
on. You may edit this format at any time as well as use it as a template
for new report formats in the future.

![]() To create a custom
format batch report using an input file
To create a custom
format batch report using an input file


